---
# title: Courses
weight: 3
---
# Prerequisites
Before diving in, make sure you're comfortable with the following:
- **Java** — solid understanding of the language
- **Object-oriented programming** — classes, methods and interfaces
- **Databases** — tables, primary keys, foreign keys, relationships, etc.
- **SQL** — ability to write basic SQL statements
---
# What is a Spring Framework?
**Spring** is a popular framework for building Java applications. It has a lot of modules, each designed to handle a specific task. They are combined into a few different layers.

*Img. 1 — Spring layers*
| **Layer** | **Purpose** |
|-----------|-------------|
| *Core* | Handling dependency injection, managing objects |
| *Web* | Building web applications |
| *Data* | Working with databases |
| *AOP* | Aspect oriented programming |
| *Test* | Testing spring components |
---
While the Spring Framework is powerful, using it often involves a lot of configuration. For example, if you want to build a web app you might need to setup a web server, configure routing and manage dependencies manually. That's when **Spring Boot** comes in.
> [!NOTE]
> You can think of Spring Boot as a layer on top of the Spring Framework that takes care of all of the setup. *Spring Boot* simplifies Spring development by providing sensible defaults and ready-to-use features.
By the way, the Spring Framework is just one part of a larger family of projects in the **Spring ecosystem**.

*Img. 2 — Spring ecosystem*
| **Module Name** | **Purpose** |
|------------------------|-------------|
| *Spring Data* | Simplifying database access |
| *Spring Security* | Adding authentication and authorization |
| *Spring Batch* | Batch processing |
| *Spring Cloud* | Building microservices and distributed systems |
| *Spring Integration* | Simplifying messaging and integration between systems |
---
# Initialize Spring Boot Project
To initialize a new Spring Boot project, go to [start.spring.io](https://start.spring.io/) and select the options that suit you.
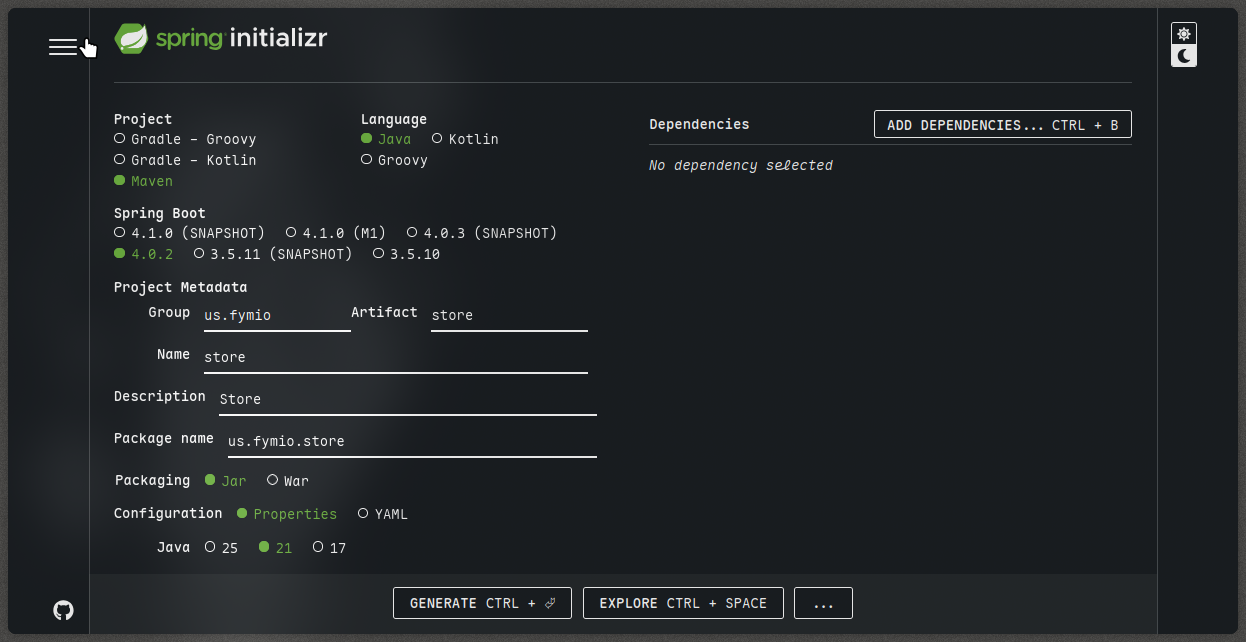
*Img. 3 — Spring Boot options*
After unpacking the `zip` archive, you'll have this template project:
```bash
.
├── HELP.md
├── mvnw
├── mvnw.cmd
├── pom.xml
├── src
│ ├── main
│ │ ├── java
│ │ │ └── tech
│ │ │ └── codejava
│ │ │ └── store
│ │ │ └── StoreApplication.java
│ │ └── resources
│ │ └── application.properties
│ └── test
│ └── java
│ └── tech
│ └── codejava
│ └── store
│ └── StoreApplicationTests.java
└── target
├── classes
│ ├── application.properties
│ └── tech
│ └── codejava
│ └── store
│ └── StoreApplication.class
├── generated-sources
│ └── annotations
├── generated-test-sources
│ └── test-annotations
├── maven-status
│ └── maven-compiler-plugin
│ ├── compile
│ │ └── default-compile
│ │ ├── createdFiles.lst
│ │ └── inputFiles.lst
│ └── testCompile
│ └── default-testCompile
│ ├── createdFiles.lst
│ └── inputFiles.lst
├── surefire-reports
│ ├── TEST-tech.codejava.store.StoreApplicationTests.xml
│ └── tech.codejava.store.StoreApplicationTests.txt
└── test-classes
└── tech
└── codejava
└── store
└── StoreApplicationTests.class
```
The "heart" of our project is `pom.xml`:
```xml
4.0.0
org.springframework.boot
spring-boot-starter-parent
4.0.2
tech.codejava
store
0.0.1-SNAPSHOT
store
Store
21
org.springframework.boot
spring-boot-starter
org.springframework.boot
spring-boot-starter-test
test
org.springframework.boot
spring-boot-maven-plugin
```
Maven uses this file to download dependencies and build our project.
In the `src` folder we have the actual code:
```bash
src
├── main
│ ├── java
│ │ └── tech
│ │ └── codejava
│ │ └── store
│ │ └── StoreApplication.java
│ └── resources
│ └── application.properties
└── test
└── java
└── tech
└── codejava
└── store
└── StoreApplicationTests.java
```
`StoreApplication.java` is the entry point to our application:
```java
package tech.codejava.store;
import org.springframework.boot.SpringApplication;
import org.springframework.boot.autoconfigure.SpringBootApplication;
@SpringBootApplication
public class StoreApplication {
public static void main(String[] args) {
SpringApplication.run(StoreApplication.class, args);
}
}
```
In the `main` method we have a call to `SpringApplication.run`.
Running `mvn clean install` from the root of our project gives us this result *(output partially reduced)*:
```bash
...
[INFO] Tests run: 1, Failures: 0, Errors: 0, Skipped: 0, Time elapsed: 2.542 s -- in tech.codejava.store.StoreApplicationTests
[INFO]
[INFO] Results:
[INFO]
[INFO] Tests run: 1, Failures: 0, Errors: 0, Skipped: 0
[INFO]
[INFO]
[INFO] --- jar:3.4.2:jar (default-jar) @ store ---
[INFO] Building jar: /home/fymio/store/target/store-0.0.1-SNAPSHOT.jar
[INFO]
[INFO] --- spring-boot:4.0.2:repackage (repackage) @ store ---
...
[INFO] BUILD SUCCESS
[INFO] ------------------------------------------------------------------------
[INFO] Total time: 14.787 s
[INFO] Finished at: 2026-02-19T13:16:47+03:00
[INFO] ------------------------------------------------------------------------
```
Our application built without errors.
---
# Dependency Management
Dependencies are third-party libraries or frameworks we use in our application. For example, to build a web application we need an embedded web server like *Tomcat*, libraries for handling web requests, building APIs, processing JSON data, logging and so on.
In Spring Boot applications, instead of adding multiple individual libraries, we can use a **starter dependency**.

*Img. 5 — Spring Boot Starter Web*
To use this dependency, copy the following into your `pom.xml`:
```xml
org.springframework.boot
spring-boot-starter-web
4.1.0-M1
```
So the `dependencies` section would look like this:
```xml
org.springframework.boot
spring-boot-starter
org.springframework.boot
spring-boot-starter-test
test
org.springframework.boot
spring-boot-starter-web
```
> [!IMPORTANT]
> Notice that the version is commented out. It's a better practice to let Spring Boot decide what version of the dependency to use, as it ensures compatibility across your project.
---
# Controllers
**Spring MVC** stands for *Model View Controller*.
- **Model** is where our application's data lives. It represents the business logic and is usually connected to a database or other data sources. In Spring Boot, the model can be a simple Java class.
- **View** is what the user sees. It's the HTML, CSS or JavaScript rendered in the browser. In Spring MVC, views can be static files or dynamically generated.
- **Controller** is like a traffic controller. It handles incoming requests from the user, interacts with the model to get data and then tells the view what to display.
Let's add a new Java class called `HomeController` at `src/main/java/tech/codejava/store/HomeController.java`:
```java
package tech.codejava.store;
public class HomeController {}
```
To make this a controller, decorate it with the `@Controller` annotation:
```java
package tech.codejava.store;
import org.springframework.stereotype.Controller;
@Controller
public class HomeController {}
```
Now let's add an `index` method. When we send a request to the root of our website, we want this method to be called:
```java
package tech.codejava.store;
import org.springframework.stereotype.Controller;
import org.springframework.web.bind.annotation.RequestMapping;
@Controller
public class HomeController {
@RequestMapping("/") // this represents the root of our website
public String index() {
return "index.html"; // this returns the view
}
}
```
Now we need to create the view. Add `index.html` at `src/main/resources/static/index.html`:
```html
View
Hello world!
```
Let's build and run our application using `mvn spring-boot:run`. From the logs:
```bash
2026-02-19T14:55:23.948+03:00 INFO 36752 --- [store] [ main] o.s.boot.tomcat.TomcatWebServer : Tomcat initialized with port 8080 (http)
```
Our app is up and running at [localhost:8080](http://localhost:8080/).

*Img. 7 — Our app is up and running!*
---
# Configuring Application Properties
Let's take a look at `src/main/resources/application.properties`:
```properties
spring.application.name=store
```
To use this property in our code, we can use the `@Value` annotation. Let's update `HomeController` to print the application name:
```java
package tech.codejava.store;
import org.springframework.beans.factory.annotation.Value;
import org.springframework.stereotype.Controller;
import org.springframework.web.bind.annotation.RequestMapping;
@Controller
public class HomeController {
@Value("${spring.application.name}")
private String appName;
@RequestMapping("/") // this represents the root of our website
public String index() {
System.out.println("application name = " + appName);
return "index.html"; // this returns the view
}
}
```
After running the application, we can see `store` printed in the terminal:
```bash
...
2026-02-19T15:32:37.507+03:00 INFO 41536 --- [store] [nio-8080-exec-1] o.s.web.servlet.DispatcherServlet : Initializing Servlet 'dispatcherServlet'
2026-02-19T15:32:37.509+03:00 INFO 41536 --- [store] [nio-8080-exec-1] o.s.web.servlet.DispatcherServlet : Completed initialization in 2 ms
application name = store
...
```
---
# Dependency Injection
Imagine we're building an E-Commerce application that handles placing orders. When an order is placed, the customer's payment needs to be processed — so `OrderService` depends on a payment service like `StripePaymentService`. We can say that `OrderService` is *dependent on* (or *coupled to*) `StripePaymentService`.

*Img. 8 — Depends On/Coupled To relation*
Let's talk about the issues that arise when one class is **tightly coupled** to another.
1. **Inflexibility** — `OrderService` can only use `StripePaymentService`. If tomorrow we decide to switch to a different payment provider like PayPal, we would have to modify `OrderService`. Once we change it, it has to be recompiled and retested, which could impact other classes that depend on it.
2. **Untestability** — We cannot test `OrderService` in isolation, because `OrderService` is tightly coupled with `StripePaymentService` and we can't test its logic separately from it.
> [!NOTE]
> The problem here isn't that `OrderService` *depends* on `StripePaymentService` — dependencies are normal in any application. The issue is about *how* the dependency is created and managed.
**Analogy:** Think of a restaurant. A restaurant needs a chef — that's a perfectly normal dependency. If the current chef becomes unavailable, the restaurant can hire another one.

*Img. X — Restaurant — Chef dependency (Normal)*
Now what if we replace "chef" with a specific person: John? Our restaurant is now dependent on *John specifically*. If John becomes unavailable, we can't replace him — the restaurant is in trouble. This is an example of **tight** or **bad coupling**.

*Img. X — Restaurant — John dependency (Bad coupling)*
We don't want `OrderService` to be tightly coupled to a specific payment service like Stripe. Instead, we want it to depend on a `PaymentService` *interface*, which could be Stripe, PayPal, or any other provider. To achieve this we can use the *interface* to decouple `OrderService` from `StripePaymentService`.

*Img. X — `PaymentService` as `interface`*
If `OrderService` depends on a `PaymentService` interface, it doesn't know anything about Stripe, PayPal, or any other payment provider. As long as these providers implement `PaymentService`, they can be used to handle payments — and `OrderService` won't care which one is being used.
**Benefits:**
1. If we replace `StripePaymentService` with `PayPalPaymentService`, the `OrderService` class is not affected.
2. We don't need to modify or recompile `OrderService`.
3. We can test `OrderService` in isolation, without relying on the specific payment provider like Stripe.
With this setup, we simply give `OrderService` a particular implementation of `PaymentService`. This is called **dependency injection** — we *inject* the dependency into a class.

*Img. X — Dependency Injection example*
Let's see how it works in our project. Create `OrderService` at `src/main/java/tech/codejava/store/OrderService.java`:
```java
package tech.codejava.store;
public class OrderService {
public void placeOrder() {}
}
```
> [!NOTE]
> In a real project we would need to provide something like `Order order` to this method, but for teaching purposes we won't do that.
Now create `StripePaymentService` in the same directory:
```java
package tech.codejava.store;
public class StripePaymentService {
public void processPayment(double amount) {
System.out.println("=== STRIPE ===");
System.out.println("amount: " + amount);
}
}
```
Let's implement `placeOrder` in `OrderService` using `StripePaymentService`:
```java
package tech.codejava.store;
public class OrderService {
public void placeOrder() {
var paymentService = new StripePaymentService();
paymentService.processPayment(10);
}
}
```
> [!IMPORTANT]
> This is our *before* setup — before we introduced the interface. In this implementation, `OrderService` is **tightly coupled** to `StripePaymentService`. We cannot test `OrderService` in isolation, and switching to another payment provider would require modifying `OrderService`.
Let's fix this. Create a `PaymentService` interface in the same directory:
```java
package tech.codejava.store;
public interface PaymentService {
void processPayment(double amount);
}
```
Modify `StripePaymentService` to implement `PaymentService`:
```java
package tech.codejava.store;
public class StripePaymentService implements PaymentService {
@Override
public void processPayment(double amount) {
System.out.println("=== STRIPE ===");
System.out.println("amount: " + amount);
}
}
```
The recommended way to inject a dependency into a class is via its **constructor**. Let's define one in `OrderService`:
```java
package tech.codejava.store;
public class OrderService {
private PaymentService paymentService;
public OrderService(PaymentService paymentService) {
this.paymentService = paymentService;
}
public void placeOrder() {
paymentService.processPayment(10);
}
}
```
Now let's see this in action. Modify `StoreApplication`:
```java
package tech.codejava.store;
import org.springframework.boot.SpringApplication;
import org.springframework.boot.autoconfigure.SpringBootApplication;
@SpringBootApplication
public class StoreApplication {
public static void main(String[] args) {
// SpringApplication.run(StoreApplication.class, args);
var orderService = new OrderService(new StripePaymentService());
orderService.placeOrder();
}
}
```
Running the application *(output intentionally reduced)*:
```bash
...
=== STRIPE ===
amount: 10.0
...
```
Now let's create a `PayPalPaymentService` in the same directory:
```java
package tech.codejava.store;
public class PayPalPaymentService implements PaymentService {
@Override
public void processPayment(double amount) {
System.out.println("=== PayPal ===");
System.out.println("amount: " + amount);
}
}
```
Now we can switch from `StripePaymentService` to `PayPalPaymentService` in `StoreApplication` — without touching `OrderService` at all:
```java
package tech.codejava.store;
import org.springframework.boot.SpringApplication;
import org.springframework.boot.autoconfigure.SpringBootApplication;
@SpringBootApplication
public class StoreApplication {
public static void main(String[] args) {
// SpringApplication.run(StoreApplication.class, args);
// var orderService = new OrderService(new StripePaymentService());
var orderService = new OrderService(new PayPalPaymentService());
orderService.placeOrder();
}
}
```
```bash
...
=== PayPal ===
amount: 10.0
...
```
Notice that we didn't change `OrderService`. In *object-oriented programming* this is known as the **Open/Closed Principle**:
> A class should be open for extension and closed for modification.
In other words: we should be able to add new functionality to a class without changing its existing code. This reduces the risk of introducing bugs and breaking other parts of the application.
---
## Setter Injection
Another way to inject a dependency is via a **setter**. In `OrderService`, let's define one:
```java
package tech.codejava.store;
public class OrderService {
private PaymentService paymentService;
public void setPaymentService(PaymentService paymentService) {
this.paymentService = paymentService;
}
public OrderService(PaymentService paymentService) {
this.paymentService = paymentService;
}
public void placeOrder() {
paymentService.processPayment(10);
}
}
```
We can use it like this in `StoreApplication`:
```java
package tech.codejava.store;
import org.springframework.boot.SpringApplication;
import org.springframework.boot.autoconfigure.SpringBootApplication;
@SpringBootApplication
public class StoreApplication {
public static void main(String[] args) {
// SpringApplication.run(StoreApplication.class, args);
// var orderService = new OrderService(new StripePaymentService());
var orderService = new OrderService(new PayPalPaymentService());
orderService.setPaymentService(new PayPalPaymentService());
orderService.placeOrder();
}
}
```
> [!IMPORTANT]
> If you remove the constructor from `OrderService` and forget to call the setter, the application will crash with a `NullPointerException`. Use setter injection only for **optional** dependencies — ones that `OrderService` can function without.